Gesture Detector in Row- Flutter
I’m Emmanuel David Tuksa, a Software Engineer passionate about building impactful digital experiences and solving real-world problems through technology. With a strong foundation in software engineering and a focus on mobile and web solutions, I’m driven to craft user-centric products that scale and delight. I continuously seek opportunities to learn, contribute to open-source, and push the boundaries of what technology can achieve. Whether it’s leading teams, optimizing workflows, or building something from scratch, my goal is simple: create meaningful software that empowers users and teams alike. Let’s build something great together.
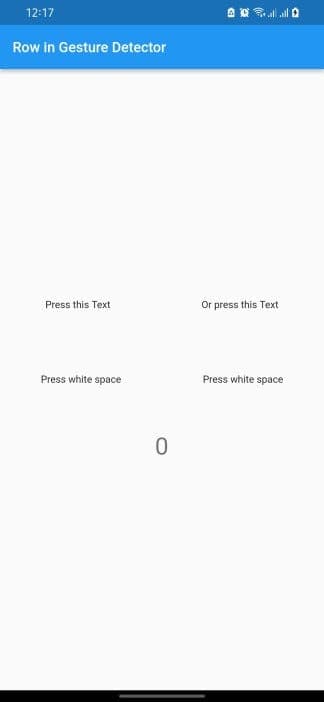
In flutter, GestureDetector is a commonly used widget. It is simply a widget that detects gestures. It can be used to wrap other widgets that you want to be clickable. This enables us to create custom buttons and custom clickable widgets. However, when a Row is wrapped with a GestureDetector the GestureDetector detects clicks on only the children of the Row and not the entire Row itself. Confused? Take a look at the image below.
On the first Row, when the white space between “Press this Text” and “Or press this Text” is clicked, no action is carried out. However, on the second Row when the white space is clicked the action is carried out. In this article, we’ll be looking at how to make the entire Row clickable and not just children of the Row.
1. create your flutter project
This can be achieved by running
flutter create project_name
2. Add this to your main.dart file
import 'package:flutter/material.dart';
void main() {
runApp(const MyApp());
}
class MyApp extends StatelessWidget {
const MyApp({Key? key}) : super(key: key);
@override
Widget build(BuildContext context) {
return MaterialApp(
title: 'Row in Gesture Detector',
theme: ThemeData(
primarySwatch: Colors.blue,
),
debugShowCheckedModeBanner: false,
home: const MyHomePage(title: 'Row in Gesture Detector'),
);
}
}
class MyHomePage extends StatefulWidget {
const MyHomePage({Key? key, required this.title}) : super(key: key);
final String title;
@override
State createState() => _MyHomePageState();
}
class _MyHomePageState extends State {
@override
Widget build(BuildContext context) {
return Scaffold();
}
}
3. Create the increment method to test the gesture behavior
Add this to the MyHomePageState class
int _counter = 0;
void _incrementCounter() {
setState(() {
_counter++;
});
}
4. Create the Row and wrap with Gesture Detector
Add this to the Scaffold body
return Scaffold(
appBar: AppBar(
title: Text(widget.title),
),
body: Center(
child: Column(
mainAxisAlignment: MainAxisAlignment.center,
children: [
GestureDetector(
onTap: _incrementCounter,
child: Row(
mainAxisSize: MainAxisSize.max,
mainAxisAlignment: MainAxisAlignment.spaceAround,
crossAxisAlignment: CrossAxisAlignment.center,
children: const [
Text(
'Press this Text'
),
Text(
'Or press this Text'
)
],
),
),
const SizedBox(height: 80,),
GestureDetector(
behavior: HitTestBehavior.opaque,
onTap: _incrementCounter,
child: Row(
mainAxisSize: MainAxisSize.max,
mainAxisAlignment: MainAxisAlignment.spaceAround,
crossAxisAlignment: CrossAxisAlignment.center,
children: const [
Text(
'Press white space'
),
Text(
'Press white space'
)
],
),
),
const SizedBox(height: 60,),
Text(
'$_counter',
style: Theme.of(context).textTheme.headline4,
),
],
),
),
);
If you notice in the code, we have two sepeate Rows wrapped with GestureDetector. One has behavior set while the other doesn’t. The GestureDetector with behavior set is the one that enables the whole Row clickable and I’ll be explaining that shortly.
The GestureDetector widget has a field behavior that determines how the GestureDetector acts when hit. The behavior field is of type HitTestBehavior. By default, the behavior field is set to HitTestBehavior.deferToChild which ensures that the GestureDetector receives events only when one of the children of its target is being hit. That sometimes might not be a good user experience. Setting the behavior field to HitTestBehavior.Opaque enables the GestureDetector to receive events as long as the hit was received within the target’s bounds.
Conclusion
We have reached the end of this article. I hope it has been helpful so far. If you have any more questions or want to engage feel free to connect with me on Twitter or LinkedIn. Do appreciate the article with some claps and comments.
If you want the complete code, here is a link to the github repository of the project.